
In the digital age, our online activities often paint a vivid picture of our preferences and habits. Netflix, the streaming giant, is no exception, offering personalized recommendations based on your viewing history.
However, there are times when we wish to start afresh, removing traces of what we’ve watched, either for privacy reasons or simply to refine our recommendations. Whether it’s a guilty pleasure show or a series you’d rather forget, this guide will walk you through the steps to clear your Netflix history.
Key Takeaways
- To delete your Netflix history, sign into your account, select the profile you wish to edit, navigate to Account settings, find the Viewing activity section, and click the “hide from viewing history” icon next to the titles you want to remove.
- Create separate profiles for different viewers or content types
- Netflix provides parental controls that allow you to restrict the content accessible to children, ensuring they only view age-appropriate material.
- Deleting items from your viewing history is irreversible, affecting your future recommendations by excluding the removed titles from the suggestion algorithm.
Step-by-Step Guide
Step 1: Sign In to Your Netflix Account
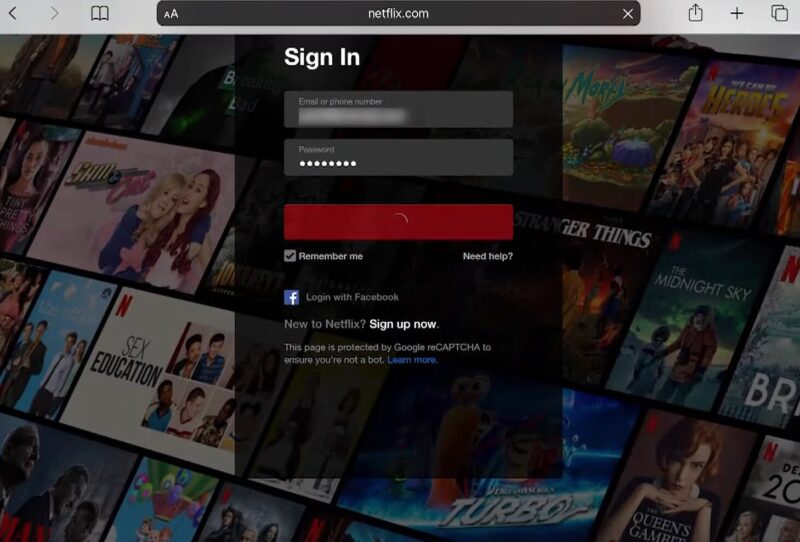
- Open your web browser and go to the Netflix website. Click on the ‘Sign In’ button at the top right corner of the page.
- Enter your email address and password associated with your Netflix account.
If you encounter issues accessing Netflix, read our post about how to ensure a smooth streaming session
Step 2: Select the Profile
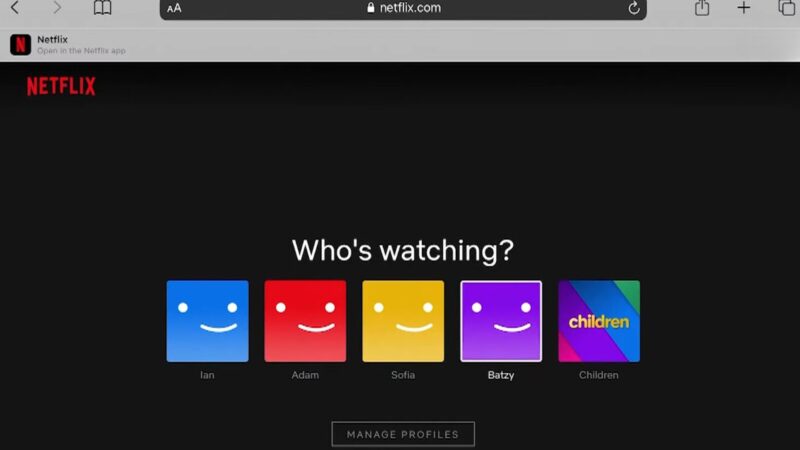
- After signing in, you’ll see a list of profiles associated with your account.
- Choose the profile you want to edit. Netflix tracks viewing history separately for each profile, so make sure you select the correct one.
Step 3: Access Account Settings
- Hover over your profile icon in the top right corner.
- A dropdown menu will appear. Click on ‘Account’. This takes you to a page where you can manage various aspects of your account, including email, password, and viewing activity.
Step 4: Find the Viewing Activity Section
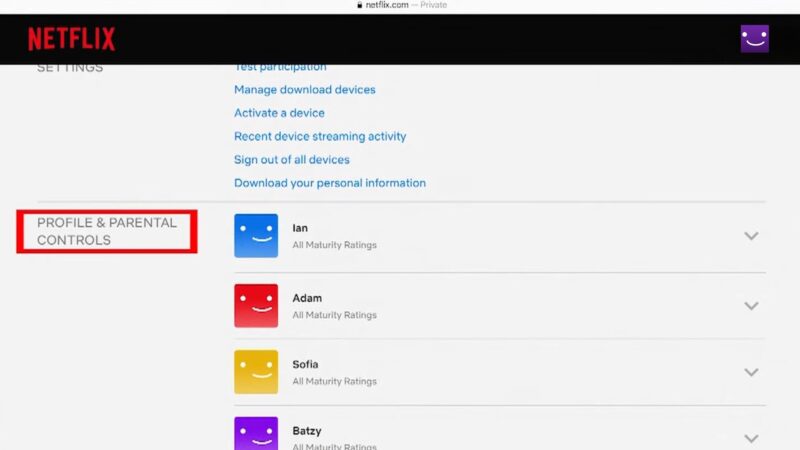
- Scroll down to the ‘Profile & Parental Controls’ section and click on the profile you’re editing.
- Then, find and click on ‘Viewing activity’. This link directs you to a list of all the shows and movies you’ve watched on that profile.

Step 5: Remove Items from Your History
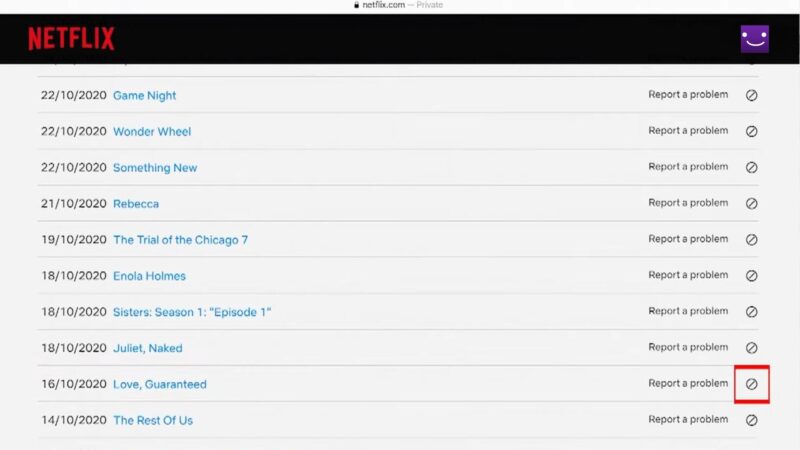
- Next to each title, you’ll see a circle with a line through it (🚫).
- Click this icon to remove a title from your viewing history. It may take up to 24 hours for the title to disappear from your viewing history and stop influencing your recommendations.
Step 6: Hide All Viewing Activity (Optional)

- If you want to clear your entire viewing history, scroll to the bottom of the page and look for the option to hide all.
- Click on it, and confirm your choice. This will remove all titles from your viewing history and reset your recommendations.
Tips for Managing Your Netflix History
Maintaining a clean and relevant Netflix viewing history is crucial for a personalized streaming experience. Here are expanded tips on how to manage your Netflix history effectively:
1. Periodically Review Your Viewing Activity
Netflix’s recommendation algorithm uses your viewing history to suggest new titles. Over time, one-time views or shows you didn’t enjoy can skew these recommendations. Set a monthly or quarterly reminder to go through your viewing activity.
Look for titles that don’t reflect your current tastes or were watched out of curiosity and remove them. This proactive approach keeps your recommendations fresh and relevant. Regular maintenance ensures that your home page showcases titles that genuinely interest you, enhancing your streaming experience.
2. Create Separate Profiles for Different Viewers or Types of Content
Different household members have unique tastes. Watching all content under one profile can lead to a confusing mix of recommendations. Create individual profiles for each member of your household. Consider additional profiles for specific content types, such as “Family Movies” or “Documentaries,” to further tailor your viewing recommendations.
This strategy prevents crossover and keeps recommendations specific to each viewer’s preferences. It also makes it easier to maintain viewing histories, as each profile’s history is separate.
3. Utilize Netflix’s Parental Controls to Restrict What Children Can Watch
Protecting children from inappropriate content is a priority for many parents. Netflix offers settings to help manage what your children can access. In the account settings, you can set maturity levels for each profile, requiring a PIN for access to content above selected maturity ratings.
You can also review and remove inappropriate titles from children’s viewing histories. Utilizing parental controls ensures children enjoy age-appropriate content, and it keeps their viewing habits from influencing adult profiles. This separation helps maintain a safe and enjoyable streaming environment for the whole family.
However, if you’re not satisfied with this feature or what Netflix offers in general, it would be best to compare its features with some other platform, like Peacock.
Additional Tips:
- Watch in Incognito Mode for One-Offs: If you’re curious about a title but unsure if you’ll like it, consider watching it in a profile set aside for experimental viewing. This way, if you don’t enjoy it, your main profile’s recommendations remain unaffected.
- Leverage the “Profiles” for Mood-Based Viewing: Create profiles based on your mood or genre preference, such as “Feel-Good Movies” or “Horror Nights.” This can help you segregate your viewing habits and recommendations further.
- Regularly Update Profile Preferences: Beyond managing your viewing history, periodically update your profile preferences, including language and subtitle settings, to ensure a more tailored viewing experience.
FAQs
Can I recover deleted viewing history on Netflix?
Once you delete an item from your viewing history, it’s permanently removed and cannot be recovered. This action also affects your recommendations, as Netflix will no longer use the deleted item to suggest similar content.
How long does Netflix keep my viewing history?
Netflix stores your viewing history indefinitely, as long as your account remains active. This extensive history contributes to refining your content recommendations over time.
Is it possible to delete viewing history from all profiles at once?
No, you must delete the viewing history individually for each profile. Netflix does not offer an option to clear the viewing history of all profiles simultaneously, reflecting the platform’s design to tailor recommendations for each user’s specific tastes.
Can I see my viewing history on all devices?
Yes, your viewing history is synced across all devices where you’re logged in with the same account. You can access and manage your viewing history from any device with internet access.
Does Netflix allow users to lock their viewing history?
Netflix does not offer a feature to lock or hide your viewing history from others who have access to your account or profile. The best way to maintain privacy is by using separate profiles and setting up a PIN for profile access if needed.
Final Words
Managing your Netflix history not only protects your privacy but also ensures that your recommendations stay accurate and tailored to your current tastes. Whether you’re cleaning up your watch list or just curious about what the platforms knows about your viewing habits, following these steps will give you control over your digital footprint on the platform.